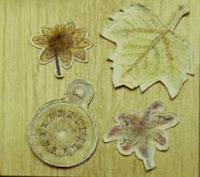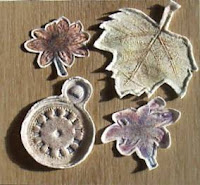

Since I'm inept with the royal camera, I have included two pictures of the paper molds I made. In reality the colors are somewhere between the washed out yellow picture on the top, and the shadow ridden picture on the bottom. (These are the results even after the Queen employed the services of Her picture editing software. What was that post about "needing" PhotoShop??) I'm postulating that my pieces came out with a softer effect that JJ's because of the substrate used - and the fact that I have not put any sort of finish on mine. After I add the hands to the watch then I will probably finish these off - unless I end up dorking around and also add some detail work or doodles. Before I move onto the supplies and instructions, I want to mention the two flowers are done on one substrate, while the watch and leaf were constructed from the material I originally used when I began playing around with this. Both work just fine and will yield similar results.
SUPPLIES
Rubber stamp with image of your choice*
Warm water
TOILET PAPER -or- PAPER TOWEL**
Rubber stamp with image of your choice*
Warm water
TOILET PAPER -or- PAPER TOWEL**
* Regular rubber stamps work best altho you can try using foam or clear stamps. The technique works best with deeply etched rubber - however, if you want a more subtle impression then try foam or the clear stamps. Another note: It is much more difficult to get a good impression with a detailed stamp - open images without tiny details always come out more clear. Experiment with the look you want - don't let my observations limit your creativity...I am only providing this information to save others from the headaches I've encountered.
** You do not need TP and PTs - it's either/or. I began my exploration with this technique with TP...but PTs are another option. Results will vary with different TP brands - the above samples are done with one-ply Charmin. (And yes, you now know which brand is employed in the royal thrones!) Since Charmin, Northern and Angel Soft have a "linty" feel, you will end up with a softer and fuzzier piece. These brands will get fuzzier or "lintier" the more they are rubbed and worked with. If you use PTs, Viva is a terrific brand because of the fabric-like qualities it has. Experimenting with different brands of TP and PTs is sure to increase the usefulness of this technique - so explore! Go on...do it. It's only TP and PTs - inexpensive things found in every home and meant to be thrown out anyway. IF you do not have TP or PTs readily available, you have much bigger issues than art. Contact me IMMEDIATELY - we need to talk.
And yes, "linty" and "lintier" are real words...look!


TP: Count out 10 squares, accordian fold. (Any less than 4 squares and the final piece is flimsy and doesn't take detail very well.) PT: Fold PT in half, trim larger than image.
(A note on TP: Your image needs to be smaller than the size of the TP square. If you try to use an image larger than that, the perforation on the TP usually tears, leaving a nasty gap in your finished piece. If you want to use a larger image just use a PT.)

Keeping TP/PT flat, run under warm water. (I don't know why warm water works better - it just does. It's not polite to argue.) Gently fold or scrunch to wring out water - carefully squeeze between your fingers to remove excess water. Removing every extra drip isn't necessary - it just shouldn't be dripping wet. Unfold or unscrunch TP/PT and flatten out between fingers. It's important not to rub the wrinkles out - you'll end up with a linty, uneven surface. Once it's flat, center on image.

Begin pressing TP/PT into the image from the center. It's important to use firm but gentle pressure to push TP/PT into the crevices - but do not to rub! Firmly press. Using your thumb and fingers, continue pressing TP/PT into image, keeping TP/PT from slipping by holding the TP/PT to the image with a thumb. (If you move the TP/PT after you've begun imprinting the image - remove TP/PT and turn it over. Gently pat out image so the TP/PT is flat and start over.) Continue pressing until you feel you have a good impression, remembering the image won't be as clear on the back (the side you see) because of the layers of TP/PT. You can also use a brayer. Be careful when pressing that you only press the image - don't press around the edge of the stamp or you'll end up with strange edges around your image.
(Are you getting the keywords of this project are gentle and press?!)


Create a deckle edge by holding TP/PT on image with thumb and gently tearing excess TP/PT away, using the wood mount as a guide. You can also leave it until the mold is dry and cut away the excess (like I did on the colored samples above). Set aside to dry.

Once dry, lift off TP/PT. Altho you need to be gentle with the dried piece, it is surprising resilient and will hold up pretty well if you choose to add color. I have used Perfect Pearls, colored pencils, chalk, rub on metallics and mica powders to color the images. The other neat effect is to color the toilet paper or paper towel before imprinting the image. These also rock when left natural - the effect is subtle and regal when it's just the imprint with no color.
These are great for collage, cards, ATCs - anywhere you want to add 3D interest. Have fun - and don't forget to let me know what you come up with!


1 Royal Responses:
Am so glad you have these instructions on your blog; there's a whole mess od people out there who haven't done it. Hope you don't mind, but I included a blurb about your blog and a link on my blog. Let me know if you want it removed.
Post a Comment
Welcome! I will respond to comments here, in order to keep the discussion going. I try to return the love with a visit/comment to your blog.
Go ahead - flap your gums! What's the skinny?